|
|
4 years ago | |
|---|---|---|
| .gitignore | 4 years ago | |
| README.md | 4 years ago | |
| bot.py | 4 years ago | |
| grid_136549.png | 4 years ago | |
| happytrees.service | 4 years ago | |
| requirements.txt | 4 years ago | |
README.md
Happy Trees Discord Bot
Description
This is a Discord bot for taking Stable Diffusion image requests and running them on a local GPU. Use of this bot to generate images with Stable Diffusion is subject to the Stable Diffusion License, including Attachment A.
TODO
- Figure out why the persistent views don't work after a server restart. Until we fix this, interaction buttons stop working when the bot is restarted.
Setup
Clone this repository to the system where you have setup Stable Diffusion, with the optimizations from Basu Jindal's fork. We're not covering how to run Stable Diffusion here, so you're on your own there. By default, we're assuming that you're installing both of these to your user's home directory on a linux system.
You'll also need real-ESRGAN for image upscaling. We're using the portable NCNN executables, so you can just download that, or you can grab the whole repo if you're feeling adventurous.
Create a new Discord application in the Discord Developer Portal, with a name, description, and icon of your choosing. Then head over to the Bot link on the lefthand panel. Here you'll want to create a bot (yes, you're sure) and enable the "Message Content Intent" under "Privileged Gateway Intents". Once you do that, you can grab the bot token via the Reset Token button and store it in a .token file within the cloned repository folder.
Edit any paths in the bot.py file that you need for your specific system setup and then go ahead and run python3 bot.py from within the cloned directory to test it out. If everything worked and it can connect to Discord, it should print an invite link to your system console. You can use that link to invite your bot to servers where you have the "Manage Server" permission. (If you flip the "Public Bot" toggle in the Discord bot interface to "Off", from the default of "On", then only you will be able to use the invite link. If you leave it public, then anyone with the link can use the invite link. Unless you're feeling generous with your GPU cycles, you probably want to leave this private unless and only briefly toggle it off for specific periods of time when you know people should be adding the bot to other servers.)
If that all worked and you want to make this a regular thing, you can update your username in the happytrees.service file and copy it to /etc/systemd/system/. After that, you'll just need to run sudo systemctl daemon-reload to let systemd see your new file, then sudo systemctl enable happytrees.service to start the service on boot, and (optionally) sudo systemctl start happytrees.service to run a copy from the service file right now.
Usage
To use the Happy Trees bot, you need to be a member of a server to which it has been invited. At that point you can use one of the following options to get submit requests to the bot:
- Send a message in a channel that the bot is a part of and @mention the bot
- Send a message in a channel that the bot is a part of and prefix your message with
!happytreeor!happytrees - Send the bot a DM (you can @mention or use a prefix here, but it is not necessary)
A note about messages in channels: this bot does not adhere to your capitalist notions of private property. So if you make a request in a public channel, anyone can interact with the buttons on the response to get copies of the generated images or upscale those images. If you want to keep things private, talk to the bot in a DM.
The general flow of interaction is that you can provide the bot with a Stable Diffusion prompt and you will be placed in a queue to have your art generated on the local GPU. Once it is your turn, your art will be generated and provided to you in a reply to your original message. If you didn't change the defaults, then the bot will provide you with a grid composed of four 448px by 448px images and below that grid will be a set of buttons. These buttons allow you to obtain the individual 448x448 samples that the algorithm created. That step is not bound by the queue and can be completed even when other work is pending. Once you have isolated an image (either through the buttons to select from a grid or by only asking for a single image in the first place), you will also be provided with a button labeled "Embiggen". This button will allow you to upscale the image to 4x the original size, 1792x1792. Beware: This is an AI art task and will be placed in the queue to wait your turn. While we could continue to go larger, that's a reasonable size and is about the limit of Discord's default abilities. If you need something bigger than that, you'll need to get in touch with someone to do it by hand so that they can pass you the resulting file via another means.
img2img
While just tossing text at the bot will get you interesting, if somewhat random, art, there is another way to exert a touch more control. You can also attach an image to your message, which the bot will use in addition to your text prompt to generate artwork. The image that you provide can be in any standard image format (no PDFs...) and of any size. It doesn't need to be huge. Although, if you want the bot to be able to use detail from your input image and not just general shapes and colors, you will want it to be at least 1:1 with the 448x448 output size.
Options
As alluded to above, there are several options that one can use to modify the default behavior of a request. These can be placed basically anywhere in your message, including in the middle of a prompt (as long as you have spaces to separate them), but generally I recommend picking the beginning or end so that it's a bit easier for you to keep track of what you're doing.
--seed [0-1000000] will use a specific number instead of a random seed for the generation process.
--n_samples [1-4] will determine how many sample images I make for you. Default is 4.
--ddim_steps [0-80] will cause me to spend more or less compute time on the image. Default is 50.
--strength [0.00-1.00] will set how much liberty I should take in deviating from your input image, with 1 being to basically ignore the input image. Default is 0.75.
Seed
Because computers can't actually make random decisions, we settle for fancy math functions that seem to produce random output (pseudorandom number generators, or PRNGs) to simulate it. A seed tells the PRNG where to start in its sequence of fake randomness. Without this, it would always start at the same spot and you'd always get the same answers in the same order. Normally, the script pulls a seed from a combination of fairly unpredictable things in the operating system, so that you're unlikely to see the same image again. If you want to get the same answer as you did before, take note of the seed from a prior run (if you open the file and can see the file name, the name format is seed_<SEEDVALUE>_#####.png or grid_<SEEDVALUE>_####.png) and pass that same seed value in to the --seed` parameter. Note: when you generate multiple samples, the seed always increases by 1 for each sample. This is true even if you pass in a manual seed. So if you have a grid and want to do some refining based on the third sample, you'd need to use the grid's seed from the filename plus two.
DDIM Steps
The explanation in the help text is super simplified, but basically correct. You should think of this parameter as "How much work should the AI put into this?" As you can imagine, if you give the AI too little time, you won't really have any recognizable art. But on the other hand, like any good AI, if you let it spend too much time on something the results can wind up being horrific. See the below examples by way of illustration:
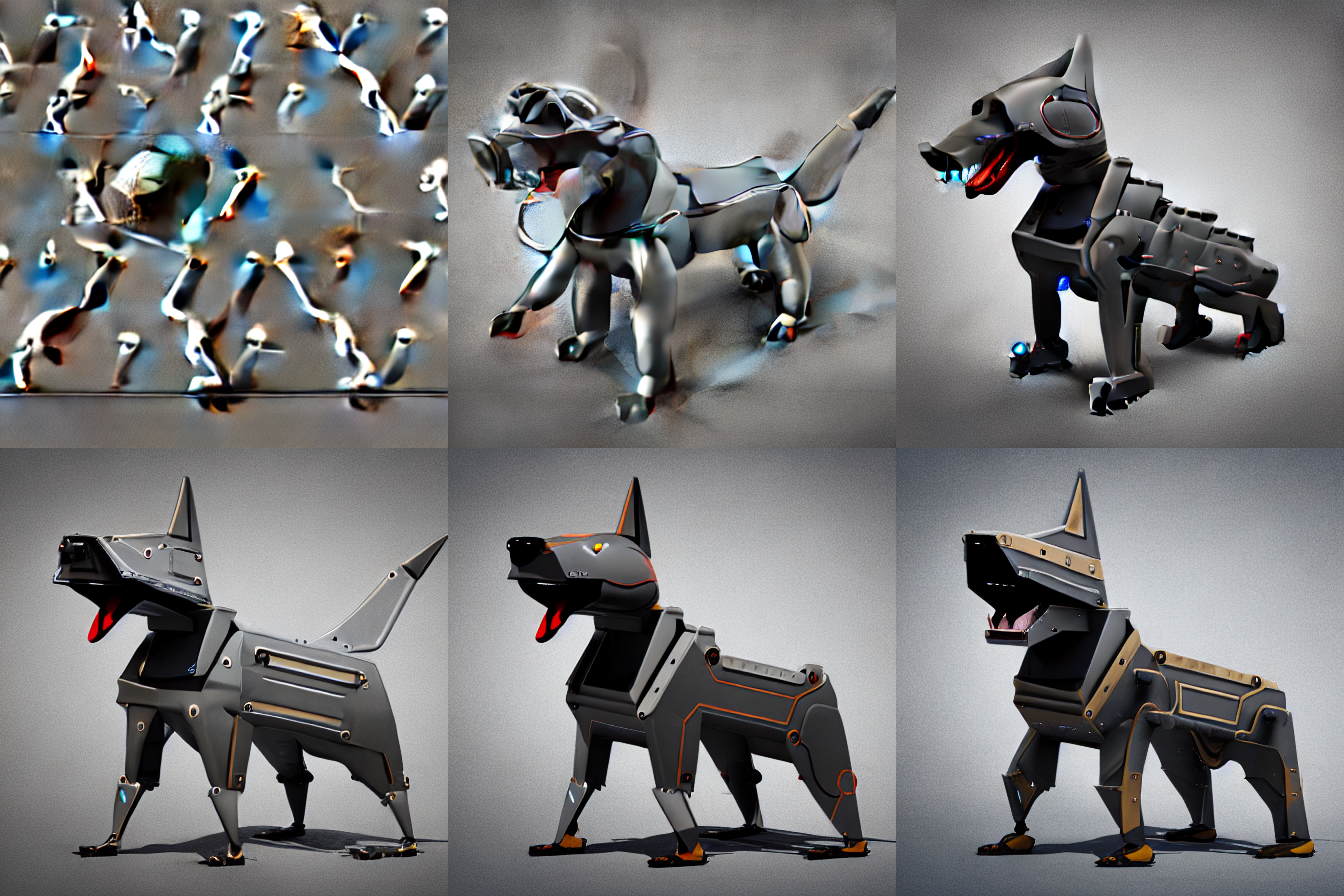
This shows the output with 5 steps (what even is that??), 10 and 15 steps (look at how they've mutilated that poor dog), 20 steps (that's pretty much the right shape), 50 steps (smoothed out more and decided to lose the tail), and 70 steps (the only one of the batch that had both reasonable features and an actual lower jaw). As you go higher, it starts editing more and taking things away (like crucial parts of the dog's head). In general, I wouldn't recommend going below 20 steps if you want to have some idea of what the prompt and seed combination actually would look like. The default, 50, is a good balance for most applications, so unless you're lowering the step count to speed things up, or tweaking it by a few steps in either direction to get rid of an annoying artifact, I'd leave it be.
Strength
This only applies to img2img requests (requests where you attached an input image to your message). Unlike the other inputs, this one is a decimal between zero and one. The closer to one that it gets, the less the AI pays attention to the input you gave it. The default gives the AI quite a bit of latitude. If you're only trying for some recoloring and minor touch-ups but have an image that you largely want to stick to, try something more conservative like --strength 0.2.
Weaknesses of the Stable Diffusion model
While Stable Diffusion can do some really impressive things, including things that other AI models explicitly refuse to do like generating images of specific people (ex. if you ask for "Javy Baez", with no other context it knows that you're talking about a baseball player and gives you decent attempts at his likeness), it still has several limitations. Regarding living things especially, it still doesn't really know what makes a person a person or a dog a dog. It has some mathematical equations in it that produce things that are remarkably realistic sometimes, but those equations lack constraints to prevent them from making silly errors like dogs with one central ear or people in positions that humans cannot ever hope to achieve. If you are wanting to make your images more reasonable, I suggest using the img2img functionality and constraining the model a bit so that it is at least starting with something in the right arrangement of limbs. Otherwise, your best bet is really just to keep fishing for a good seed value and hoping that one of the random iterations will come out right.
On the subject of img2img, as noted above quality isn't a big deal for the model, especially at higher strength values. One thing that is a known problem, though, is if you are mixing different styles of artwork. If you have a photo as a guide and say you want some birds in the sky behind you, so you draw them in with MS Paint... that won't work well. You'd be better off either drawing the whole reference image in Paint, or getting the AI to make you some birds and then cutting and pasting them into the image in the spot you want with a bit of a blur to hide the obvious edges.